> ## Documentation Index
> Fetch the complete documentation index at: https://conductorone-docs-ocsf-actor-type-changes.mintlify.site/llms.txt
> Use this file to discover all available pages before exploring further.
# Deploy self-hosted connectors
> Connectors can be hosted in your own infrastructure.
## Self-hosted connector network architecture
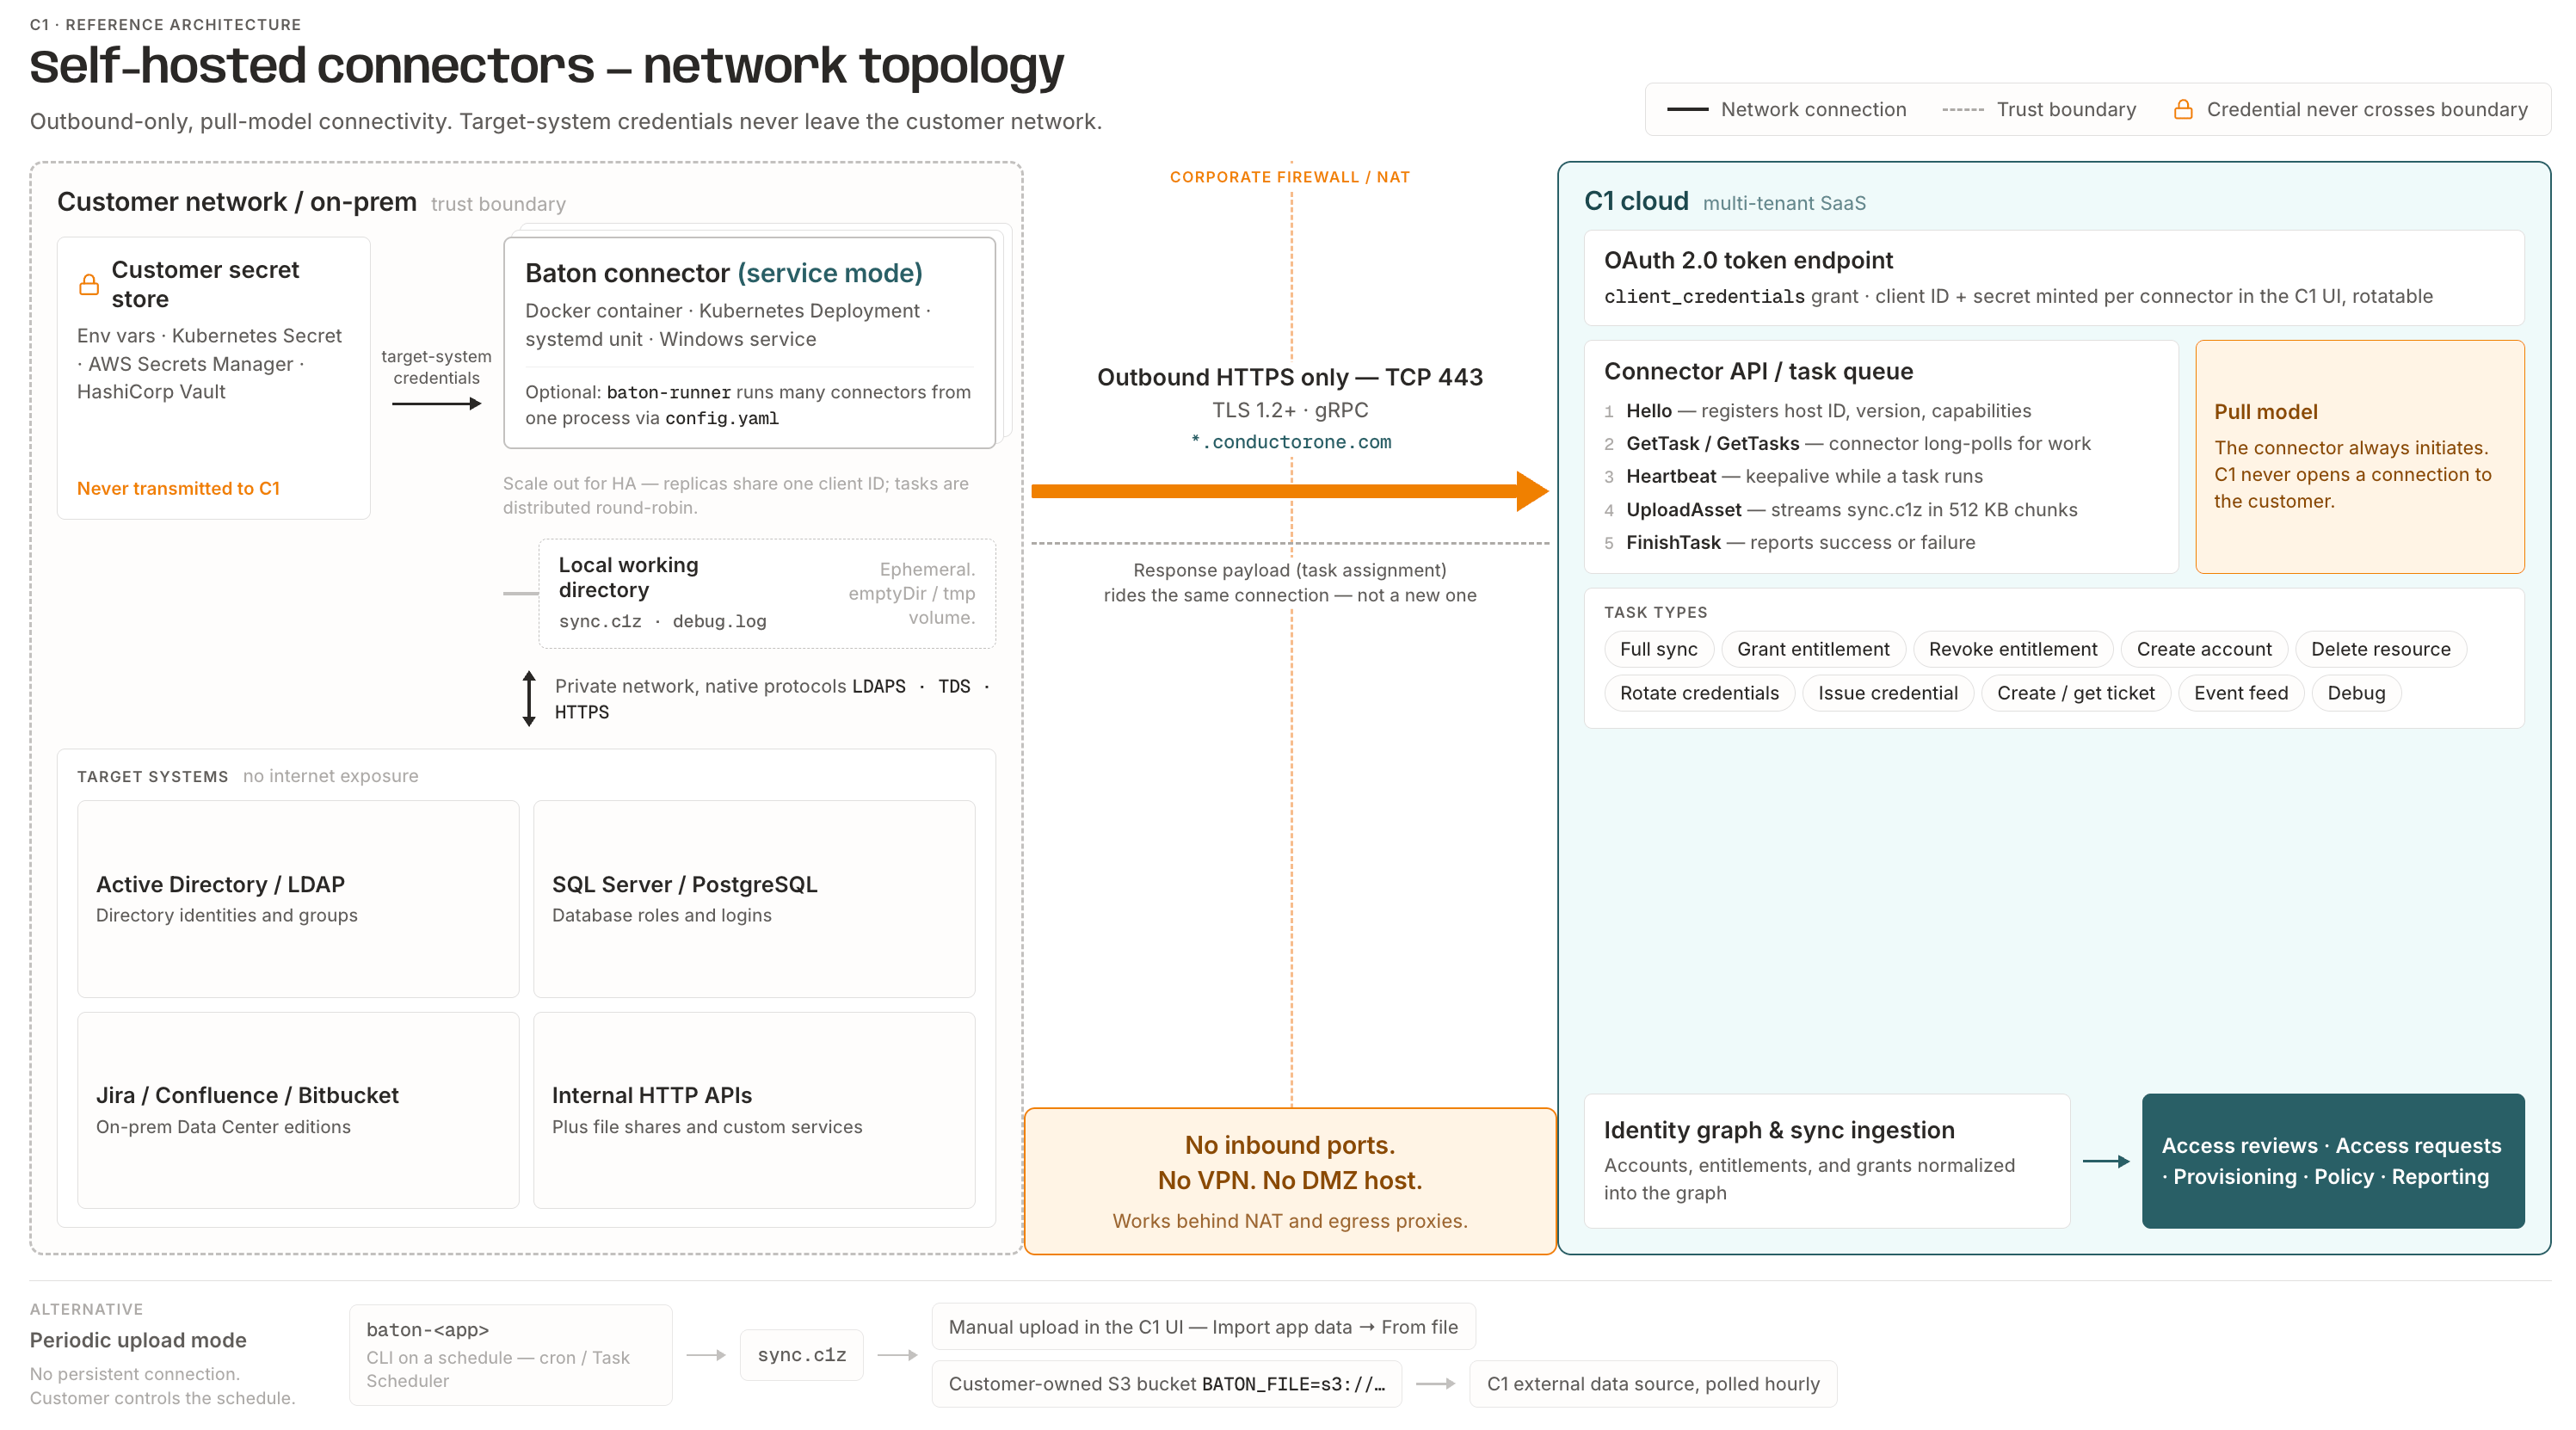
The following diagram shows how a self-hosted connector runs inside your network, how it reaches the systems it syncs, and how it communicates with C1 over an outbound-only connection.
 ## Should I use self-hosted connectors?
You might want to self-host and deploy connectors in your own environment if one or more of the following is true:
* The technology does not expose its APIs (such as in the case of a PostgreSQL database).
* The technology or application does not have a line of sight to C1’s platform and it would be inappropriate to expose that app to the internet.
* You can’t or don’t want to provide C1 with the API keys or credentials for the technology.
* You need to control the sync schedule or some other aspect of the connector.
* You wish to extend the connector’s capabilities, such as by supporting additional resources in a SaaS.
In any of these scenarios, the best option is to deploy a connector in your own environment. All of our pre-built connectors are available in the [Baton project](https://github.com/conductorone). These connectors are provided to allow for self-hosting and modification.
## Run a self-hosted connector in service mode
Integrating your self-hosted connector with C1 creates the most seamless and fully automated method of uploading your application’s data. Once the self-hosted connector is set up, the connector’s Baton service runs in your environment. The service maintains contact with C1, syncs and uploads data at regular intervals, and passes that data to the C1 UI, where you and your colleagues can use it to run access reviews and facilitate access requests for the application.
### Step 1: Locate or generate connector credentials
Navigate to the GitHub repo for the Baton connector you’re using. Go to [Baton connectors](https://github.com/conductorone) and search for the connector you need. If you can’t locate the connector you’re looking for, contact our Support team.
In the **Prerequisites** section of the GitHub repo’s README file, find the list of credentials you’ll need to set up the Baton connector.
Locate or create and save the necessary credentials. We’ll use them in Step 2.
**Need help locating the necessary credentials?**
See the corresponding [connector doc](/baton/intro).
### Step 2: Install the Baton connector
Use the commands shown in the connector’s README file to install the connector, passing in the credentials generated in Step 1 as appropriate. Brew, Docker, and source command options are available.
Run `baton- --help` to see the list of flags to be used when passing your credentials to the connector.
### Step 3: Set up the Baton connector
In C1, navigate to **Integrations** > **Connectors** and click **Add connector**.
Search for **Baton** and click **Add**.
Choose whether to add the Baton connector to an existing application in C1 (and select the app of your choice) or to create a new application.
Once configuration is complete, the application’s name will change from Baton to the name of the Baton connector you’ve integrated.
Set the owner for this connector. You can manage the connector yourself, or choose someone else from the list of C1 users. Setting multiple owners is allowed. You can change the owner later, if necessary.
Click **Create and add details**.
If you selected someone else as the owner, that person will be notified to take over this process from this point.
Find the **Settings** area of the page and click **Edit**.
Click **Rotate** to generate a new set of credentials. Carefully copy the Client ID and Secret. You’ll use them in Step 4.
#### Optional: Set a shared identity source
If you want to pull identities from an existing connector, complete these additional steps:
In the **Shared identity source** area of the page, click **Edit**.
Select the connector from which you want to pull identities.
Click **Save**.
### Step 4: Add credentials to your self-hosted connector
*In this section we’ll use the `baton-okta` connector as an example, but you can sub in the connector of your choice.*
On the server or VM where your self-hosted connector is running, pass in the Client ID and Secret generated in Step 3 by running `--client-id --client-secret `.
Run `baton-okta --help` to see the list of flags to be used when passing your credentials to the connector.
The connector syncs current data, uploads it to C1, and prints a `Task complete!` message when finished.
Check that the connector data uploaded correctly. In C1, click **Apps**. On the **Managed apps** tab, locate and click the name of the application you added the Baton connector to. The data should be found on the **Resources** and **Accounts** tabs, as appropriate.
## Run a self-hosted connector in periodic upload mode
As an alternative to running a self-hosted connector in service mode, you can set up a self-hosted connector and periodically upload its data to C1, either manually or automatically.
### Step 1: Locate or generate connector credentials
Navigate to the GitHub repo for the connector you’re using. Go to [Baton connectors](https://github.com/conductorone) to access the GitHub repos for all available connectors.
In the **Prerequisites** section of the GitHub repo’s README file, find the list of credentials you’ll need to set up the Baton connector.
Locate or create and save the necessary credentials. We’ll use them in Step 2.
**Need help locating the necessary credentials?**
See the corresponding [connector doc](/baton/intro).
### Step 2: Install the connector and sync data
Use the commands shown in the connector’s README file to install the connector, passing in the credentials generated in Step 1 as appropriate. Brew, Docker, and source command options are available.
Run `baton- --help` to see the list of flags to be used when passing your credentials to the connector.
Each installation method includes a `resources` command. This command runs the sync on the connector and stores the gathered data in a `sync.c1z` file.
Now that you’ve collected the connector data, you can choose to manually upload the data to C1 or to sync the data to an S3 bucket integrated with C1. The next step walks through each option.
### Step 3: Upload data to C1
You can upload your application’s data either manually our automatically. Follow the instructions below to set up your chosen method.
### Option 1: Manually upload connector data
Manually uploading data to C1 from an self-hosted connector is ideal when testing data ingested from the connector before automating the data upload process, or for times when you only need a single data sync.
In C1, navigate to an existing application you wish to add the connector data to, or create a new application.
* **To create a new application,** follow the steps in [Create custom applications](/product/admin/applications).
* **To use an existing application,** click **Apps**. On the **Managed apps** tab, select the application’s name from the list.
On the application’s page, scroll down to the **Connectors** area of the page.
Click **Import app data** and select **From file**.
Click **Choose file** and select the `sync.c1z` file.
Once the upload is complete, C1 adds the information pulled from the connector about accounts, groups, roles, resources, and grants (as relevant) to the application.
To update the information in C1, re-run the `resources` command and re-upload the file to C1 using the process above.
### Option 2: Automatically sync connector data to an S3 bucket
The most convenient option is to automate the process of running of the sync and ingestion of the data into C1. You can automatically pull connector data into an application by using an AWS S3 bucket as a data source.
**Before you begin:**
Complete Steps 1-3 in [Set up an external data source](/product/admin/external-datasources).
In C1, navigate to an existing application you wish to add the connector data to, or create a new application.
* **To create a new application,** follow the steps to [create a new app](/product/admin/applications#create-a-new-application).
* **To use an existing application,** click **Apps**. On the **Managed apps** tab, select the application’s name from the list.
On the application’s page, scroll down to the **Connectors** area of the page.
Click **Import app data** and select **From data source**.
Choose the data source you set up in Step 1 from the **Choose a datasource** dropdown.
In the **File name** field, enter `sync.c1z`.
Create a new file named `sync.sh` and make the file executable by running the following: `chmod +x sync.sh`.
Copy and paste the code below into the `sync.sh` file, adapting it to suit the Baton connector you’re using. See the connector’s README file for more information. We’ve used the `baton-okta` connector as an example here:
```bash theme={null}
#!/bin/bash
set -e
export BATON_API_TOKEN=oktaAPIToken
export BATON_DOMAIN=domain-1234.okta.com
export AWS_ACCESS_KEY_ID="your AWS access key"
export AWS_SECRET_ACCESS_KEY="your AWS secret access key"
export AWS_REGION="us-west-2"
export BATON_FILE="s3://my-bucket/baton-sync.c1z"
baton-okta
```
This script syncs data from the connector (in this case, Okta) and uploads it to your configured S3 bucket. Once the upload is complete, C1 adds the information pulled from the connector about accounts, groups, roles, resources, and grants (as relevant) to the application.
You can run the script on demand, or set up a scheduler to run it periodically. The S3 bucket syncs with C1 once an hour.
## Deployment examples
### Docker
Build a container for your self-hosted connector:
```dockerfile theme={null}
FROM golang:1.23-alpine AS builder
WORKDIR /app
COPY . .
RUN make build
FROM alpine:latest
COPY --from=builder /app/dist/baton-yourservice /usr/local/bin/
ENTRYPOINT ["baton-yourservice"]
```
Run in service mode:
```bash theme={null}
docker run -d \
-e BATON_CLIENT_ID=$CLIENT_ID \
-e BATON_CLIENT_SECRET=$CLIENT_SECRET \
-e BATON_API_KEY=$API_KEY \
baton-yourservice
```
### Kubernetes
Create secrets for connector credentials:
```yaml theme={null}
# baton-secrets.yaml
apiVersion: v1
kind: Secret
metadata:
name: baton-yourservice-secrets
type: Opaque
stringData:
BATON_CLIENT_ID: ""
BATON_CLIENT_SECRET: ""
BATON_API_KEY: ""
```
Deploy the connector:
```yaml theme={null}
# baton-deployment.yaml
apiVersion: apps/v1
kind: Deployment
metadata:
name: baton-yourservice
labels:
app: baton-yourservice
spec:
replicas: 1
selector:
matchLabels:
app: baton-yourservice
template:
metadata:
labels:
app: baton-yourservice
spec:
containers:
- name: baton-yourservice
image: public.ecr.aws/conductorone/baton-yourservice:latest
imagePullPolicy: IfNotPresent
envFrom:
- secretRef:
name: baton-yourservice-secrets
```
For high availability, increase replicas. Multiple instances can share the same client ID and secret; C1 distributes tasks round-robin.
### Systemd (Linux)
Create a service unit:
```ini theme={null}
# /etc/systemd/system/baton-yourservice.service
[Unit]
Description=Baton Connector for YourService
After=network.target
[Service]
Type=simple
User=baton
ExecStart=/usr/local/bin/baton-yourservice
Restart=always
RestartSec=10
EnvironmentFile=/etc/baton/yourservice.env
[Install]
WantedBy=multi-user.target
```
Environment file:
```bash theme={null}
# /etc/baton/yourservice.env
BATON_CLIENT_ID=your-client-id
BATON_CLIENT_SECRET=your-client-secret
BATON_API_KEY=your-api-key
```
Enable and start:
```bash theme={null}
sudo systemctl enable baton-yourservice
sudo systemctl start baton-yourservice
sudo systemctl status baton-yourservice
```
## Production considerations
### Credential management
Never commit credentials to source control. Options:
| Method | Use case |
| --------------------- | ------------------------------------ |
| Environment variables | Works everywhere |
| Secrets manager | AWS Secrets Manager, HashiCorp Vault |
| Kubernetes secrets | For K8s deployments |
### Network requirements
Service mode requires outbound HTTPS only:
* Connector initiates connections to C1
* No inbound ports required
* Works behind NAT and most firewalls
If you have egress filtering, allow HTTPS to `*.conductorone.com`.
### Resource requirements
Connectors are lightweight:
| Resource | Recommendation |
| -------- | --------------------------------------------------------- |
| CPU | 1 CPU (or fractional) is sufficient |
| Memory | Typically under 100MB; allocate 250-500MB for large syncs |
### Monitoring
C1 sends email alerts after three consecutive sync failures. Monitor:
* Sync status in the C1 UI
* Connector logs for errors
* Memory usage (should stay stable)
## Troubleshooting
### Permission denied errors with read-only root filesystem
Baton connectors write files to the working directory during sync operations. In Kubernetes environments where the container's root filesystem is read-only (a common security best practice), these writes fail with errors such as:
```
stat debug.log: permission denied
```
or
```
open sync.c1z: read-only file system
```
This happens because the connector needs a writable directory for:
* **`sync.c1z`** — the sync data file uploaded to C1
* **`debug.log`** — diagnostic log output created during sync tasks
#### Fix: Provide a writable working directory
The recommended fix is to set the container's working directory to a writable path and mount an `emptyDir` volume there. Update your Kubernetes deployment spec:
```yaml theme={null}
apiVersion: apps/v1
kind: Deployment
metadata:
name: baton-yourservice
spec:
replicas: 1
selector:
matchLabels:
app: baton-yourservice
template:
metadata:
labels:
app: baton-yourservice
spec:
securityContext:
runAsNonRoot: true
fsGroup: 65534
containers:
- name: baton-yourservice
image: public.ecr.aws/conductorone/baton-yourservice:latest
workingDir: /tmp/baton
envFrom:
- secretRef:
name: baton-yourservice-secrets
securityContext:
readOnlyRootFilesystem: true
allowPrivilegeEscalation: false
volumeMounts:
- name: baton-workdir
mountPath: /tmp/baton
volumes:
- name: baton-workdir
emptyDir: {}
```
Key elements of this configuration:
* **`workingDir: /tmp/baton`** tells the container to use a writable directory as its working directory.
* **`emptyDir: {}`** provides an ephemeral writable volume that is cleaned up when the pod is removed.
* **`readOnlyRootFilesystem: true`** enforces the security policy while the `emptyDir` mount provides the required writable space.
* **`runAsNonRoot: true`** and **`fsGroup: 65534`** ensure the connector runs as a non-root user with appropriate file permissions on the mounted volume.
#### Alternative: Use environment variables to redirect file output
Instead of changing the working directory, you can use the `BATON_FILE` environment variable to write the sync file to a specific writable path:
```yaml theme={null}
containers:
- name: baton-yourservice
image: public.ecr.aws/conductorone/baton-yourservice:latest
env:
- name: BATON_FILE
value: "/tmp/baton/sync.c1z"
envFrom:
- secretRef:
name: baton-yourservice-secrets
volumeMounts:
- name: baton-workdir
mountPath: /tmp/baton
```
`BATON_FILE` controls where the `sync.c1z` file is written. The `debug.log` file location is determined by the working directory or the system's temporary directory. Setting `workingDir` to a writable path is the most reliable way to ensure all connector file writes succeed.
### Connector logs show "no temporal folder found"
If you see a warning like the following in connector logs:
```
no temporal folder found on this system according to our task manager,
we may create files in the current working directory by mistake
```
This indicates the connector could not find a writable temporary directory and is falling back to the current working directory. If the working directory is also not writable (for example, due to a read-only root filesystem), subsequent file operations will fail.
To resolve this, ensure the container has a writable working directory using the `emptyDir` volume approach described above.
## Should I use self-hosted connectors?
You might want to self-host and deploy connectors in your own environment if one or more of the following is true:
* The technology does not expose its APIs (such as in the case of a PostgreSQL database).
* The technology or application does not have a line of sight to C1’s platform and it would be inappropriate to expose that app to the internet.
* You can’t or don’t want to provide C1 with the API keys or credentials for the technology.
* You need to control the sync schedule or some other aspect of the connector.
* You wish to extend the connector’s capabilities, such as by supporting additional resources in a SaaS.
In any of these scenarios, the best option is to deploy a connector in your own environment. All of our pre-built connectors are available in the [Baton project](https://github.com/conductorone). These connectors are provided to allow for self-hosting and modification.
## Run a self-hosted connector in service mode
Integrating your self-hosted connector with C1 creates the most seamless and fully automated method of uploading your application’s data. Once the self-hosted connector is set up, the connector’s Baton service runs in your environment. The service maintains contact with C1, syncs and uploads data at regular intervals, and passes that data to the C1 UI, where you and your colleagues can use it to run access reviews and facilitate access requests for the application.
### Step 1: Locate or generate connector credentials
Navigate to the GitHub repo for the Baton connector you’re using. Go to [Baton connectors](https://github.com/conductorone) and search for the connector you need. If you can’t locate the connector you’re looking for, contact our Support team.
In the **Prerequisites** section of the GitHub repo’s README file, find the list of credentials you’ll need to set up the Baton connector.
Locate or create and save the necessary credentials. We’ll use them in Step 2.
**Need help locating the necessary credentials?**
See the corresponding [connector doc](/baton/intro).
### Step 2: Install the Baton connector
Use the commands shown in the connector’s README file to install the connector, passing in the credentials generated in Step 1 as appropriate. Brew, Docker, and source command options are available.
Run `baton- --help` to see the list of flags to be used when passing your credentials to the connector.
### Step 3: Set up the Baton connector
In C1, navigate to **Integrations** > **Connectors** and click **Add connector**.
Search for **Baton** and click **Add**.
Choose whether to add the Baton connector to an existing application in C1 (and select the app of your choice) or to create a new application.
Once configuration is complete, the application’s name will change from Baton to the name of the Baton connector you’ve integrated.
Set the owner for this connector. You can manage the connector yourself, or choose someone else from the list of C1 users. Setting multiple owners is allowed. You can change the owner later, if necessary.
Click **Create and add details**.
If you selected someone else as the owner, that person will be notified to take over this process from this point.
Find the **Settings** area of the page and click **Edit**.
Click **Rotate** to generate a new set of credentials. Carefully copy the Client ID and Secret. You’ll use them in Step 4.
#### Optional: Set a shared identity source
If you want to pull identities from an existing connector, complete these additional steps:
In the **Shared identity source** area of the page, click **Edit**.
Select the connector from which you want to pull identities.
Click **Save**.
### Step 4: Add credentials to your self-hosted connector
*In this section we’ll use the `baton-okta` connector as an example, but you can sub in the connector of your choice.*
On the server or VM where your self-hosted connector is running, pass in the Client ID and Secret generated in Step 3 by running `--client-id --client-secret `.
Run `baton-okta --help` to see the list of flags to be used when passing your credentials to the connector.
The connector syncs current data, uploads it to C1, and prints a `Task complete!` message when finished.
Check that the connector data uploaded correctly. In C1, click **Apps**. On the **Managed apps** tab, locate and click the name of the application you added the Baton connector to. The data should be found on the **Resources** and **Accounts** tabs, as appropriate.
## Run a self-hosted connector in periodic upload mode
As an alternative to running a self-hosted connector in service mode, you can set up a self-hosted connector and periodically upload its data to C1, either manually or automatically.
### Step 1: Locate or generate connector credentials
Navigate to the GitHub repo for the connector you’re using. Go to [Baton connectors](https://github.com/conductorone) to access the GitHub repos for all available connectors.
In the **Prerequisites** section of the GitHub repo’s README file, find the list of credentials you’ll need to set up the Baton connector.
Locate or create and save the necessary credentials. We’ll use them in Step 2.
**Need help locating the necessary credentials?**
See the corresponding [connector doc](/baton/intro).
### Step 2: Install the connector and sync data
Use the commands shown in the connector’s README file to install the connector, passing in the credentials generated in Step 1 as appropriate. Brew, Docker, and source command options are available.
Run `baton- --help` to see the list of flags to be used when passing your credentials to the connector.
Each installation method includes a `resources` command. This command runs the sync on the connector and stores the gathered data in a `sync.c1z` file.
Now that you’ve collected the connector data, you can choose to manually upload the data to C1 or to sync the data to an S3 bucket integrated with C1. The next step walks through each option.
### Step 3: Upload data to C1
You can upload your application’s data either manually our automatically. Follow the instructions below to set up your chosen method.
### Option 1: Manually upload connector data
Manually uploading data to C1 from an self-hosted connector is ideal when testing data ingested from the connector before automating the data upload process, or for times when you only need a single data sync.
In C1, navigate to an existing application you wish to add the connector data to, or create a new application.
* **To create a new application,** follow the steps in [Create custom applications](/product/admin/applications).
* **To use an existing application,** click **Apps**. On the **Managed apps** tab, select the application’s name from the list.
On the application’s page, scroll down to the **Connectors** area of the page.
Click **Import app data** and select **From file**.
Click **Choose file** and select the `sync.c1z` file.
Once the upload is complete, C1 adds the information pulled from the connector about accounts, groups, roles, resources, and grants (as relevant) to the application.
To update the information in C1, re-run the `resources` command and re-upload the file to C1 using the process above.
### Option 2: Automatically sync connector data to an S3 bucket
The most convenient option is to automate the process of running of the sync and ingestion of the data into C1. You can automatically pull connector data into an application by using an AWS S3 bucket as a data source.
**Before you begin:**
Complete Steps 1-3 in [Set up an external data source](/product/admin/external-datasources).
In C1, navigate to an existing application you wish to add the connector data to, or create a new application.
* **To create a new application,** follow the steps to [create a new app](/product/admin/applications#create-a-new-application).
* **To use an existing application,** click **Apps**. On the **Managed apps** tab, select the application’s name from the list.
On the application’s page, scroll down to the **Connectors** area of the page.
Click **Import app data** and select **From data source**.
Choose the data source you set up in Step 1 from the **Choose a datasource** dropdown.
In the **File name** field, enter `sync.c1z`.
Create a new file named `sync.sh` and make the file executable by running the following: `chmod +x sync.sh`.
Copy and paste the code below into the `sync.sh` file, adapting it to suit the Baton connector you’re using. See the connector’s README file for more information. We’ve used the `baton-okta` connector as an example here:
```bash theme={null}
#!/bin/bash
set -e
export BATON_API_TOKEN=oktaAPIToken
export BATON_DOMAIN=domain-1234.okta.com
export AWS_ACCESS_KEY_ID="your AWS access key"
export AWS_SECRET_ACCESS_KEY="your AWS secret access key"
export AWS_REGION="us-west-2"
export BATON_FILE="s3://my-bucket/baton-sync.c1z"
baton-okta
```
This script syncs data from the connector (in this case, Okta) and uploads it to your configured S3 bucket. Once the upload is complete, C1 adds the information pulled from the connector about accounts, groups, roles, resources, and grants (as relevant) to the application.
You can run the script on demand, or set up a scheduler to run it periodically. The S3 bucket syncs with C1 once an hour.
## Deployment examples
### Docker
Build a container for your self-hosted connector:
```dockerfile theme={null}
FROM golang:1.23-alpine AS builder
WORKDIR /app
COPY . .
RUN make build
FROM alpine:latest
COPY --from=builder /app/dist/baton-yourservice /usr/local/bin/
ENTRYPOINT ["baton-yourservice"]
```
Run in service mode:
```bash theme={null}
docker run -d \
-e BATON_CLIENT_ID=$CLIENT_ID \
-e BATON_CLIENT_SECRET=$CLIENT_SECRET \
-e BATON_API_KEY=$API_KEY \
baton-yourservice
```
### Kubernetes
Create secrets for connector credentials:
```yaml theme={null}
# baton-secrets.yaml
apiVersion: v1
kind: Secret
metadata:
name: baton-yourservice-secrets
type: Opaque
stringData:
BATON_CLIENT_ID: ""
BATON_CLIENT_SECRET: ""
BATON_API_KEY: ""
```
Deploy the connector:
```yaml theme={null}
# baton-deployment.yaml
apiVersion: apps/v1
kind: Deployment
metadata:
name: baton-yourservice
labels:
app: baton-yourservice
spec:
replicas: 1
selector:
matchLabels:
app: baton-yourservice
template:
metadata:
labels:
app: baton-yourservice
spec:
containers:
- name: baton-yourservice
image: public.ecr.aws/conductorone/baton-yourservice:latest
imagePullPolicy: IfNotPresent
envFrom:
- secretRef:
name: baton-yourservice-secrets
```
For high availability, increase replicas. Multiple instances can share the same client ID and secret; C1 distributes tasks round-robin.
### Systemd (Linux)
Create a service unit:
```ini theme={null}
# /etc/systemd/system/baton-yourservice.service
[Unit]
Description=Baton Connector for YourService
After=network.target
[Service]
Type=simple
User=baton
ExecStart=/usr/local/bin/baton-yourservice
Restart=always
RestartSec=10
EnvironmentFile=/etc/baton/yourservice.env
[Install]
WantedBy=multi-user.target
```
Environment file:
```bash theme={null}
# /etc/baton/yourservice.env
BATON_CLIENT_ID=your-client-id
BATON_CLIENT_SECRET=your-client-secret
BATON_API_KEY=your-api-key
```
Enable and start:
```bash theme={null}
sudo systemctl enable baton-yourservice
sudo systemctl start baton-yourservice
sudo systemctl status baton-yourservice
```
## Production considerations
### Credential management
Never commit credentials to source control. Options:
| Method | Use case |
| --------------------- | ------------------------------------ |
| Environment variables | Works everywhere |
| Secrets manager | AWS Secrets Manager, HashiCorp Vault |
| Kubernetes secrets | For K8s deployments |
### Network requirements
Service mode requires outbound HTTPS only:
* Connector initiates connections to C1
* No inbound ports required
* Works behind NAT and most firewalls
If you have egress filtering, allow HTTPS to `*.conductorone.com`.
### Resource requirements
Connectors are lightweight:
| Resource | Recommendation |
| -------- | --------------------------------------------------------- |
| CPU | 1 CPU (or fractional) is sufficient |
| Memory | Typically under 100MB; allocate 250-500MB for large syncs |
### Monitoring
C1 sends email alerts after three consecutive sync failures. Monitor:
* Sync status in the C1 UI
* Connector logs for errors
* Memory usage (should stay stable)
## Troubleshooting
### Permission denied errors with read-only root filesystem
Baton connectors write files to the working directory during sync operations. In Kubernetes environments where the container's root filesystem is read-only (a common security best practice), these writes fail with errors such as:
```
stat debug.log: permission denied
```
or
```
open sync.c1z: read-only file system
```
This happens because the connector needs a writable directory for:
* **`sync.c1z`** — the sync data file uploaded to C1
* **`debug.log`** — diagnostic log output created during sync tasks
#### Fix: Provide a writable working directory
The recommended fix is to set the container's working directory to a writable path and mount an `emptyDir` volume there. Update your Kubernetes deployment spec:
```yaml theme={null}
apiVersion: apps/v1
kind: Deployment
metadata:
name: baton-yourservice
spec:
replicas: 1
selector:
matchLabels:
app: baton-yourservice
template:
metadata:
labels:
app: baton-yourservice
spec:
securityContext:
runAsNonRoot: true
fsGroup: 65534
containers:
- name: baton-yourservice
image: public.ecr.aws/conductorone/baton-yourservice:latest
workingDir: /tmp/baton
envFrom:
- secretRef:
name: baton-yourservice-secrets
securityContext:
readOnlyRootFilesystem: true
allowPrivilegeEscalation: false
volumeMounts:
- name: baton-workdir
mountPath: /tmp/baton
volumes:
- name: baton-workdir
emptyDir: {}
```
Key elements of this configuration:
* **`workingDir: /tmp/baton`** tells the container to use a writable directory as its working directory.
* **`emptyDir: {}`** provides an ephemeral writable volume that is cleaned up when the pod is removed.
* **`readOnlyRootFilesystem: true`** enforces the security policy while the `emptyDir` mount provides the required writable space.
* **`runAsNonRoot: true`** and **`fsGroup: 65534`** ensure the connector runs as a non-root user with appropriate file permissions on the mounted volume.
#### Alternative: Use environment variables to redirect file output
Instead of changing the working directory, you can use the `BATON_FILE` environment variable to write the sync file to a specific writable path:
```yaml theme={null}
containers:
- name: baton-yourservice
image: public.ecr.aws/conductorone/baton-yourservice:latest
env:
- name: BATON_FILE
value: "/tmp/baton/sync.c1z"
envFrom:
- secretRef:
name: baton-yourservice-secrets
volumeMounts:
- name: baton-workdir
mountPath: /tmp/baton
```
`BATON_FILE` controls where the `sync.c1z` file is written. The `debug.log` file location is determined by the working directory or the system's temporary directory. Setting `workingDir` to a writable path is the most reliable way to ensure all connector file writes succeed.
### Connector logs show "no temporal folder found"
If you see a warning like the following in connector logs:
```
no temporal folder found on this system according to our task manager,
we may create files in the current working directory by mistake
```
This indicates the connector could not find a writable temporary directory and is falling back to the current working directory. If the working directory is also not writable (for example, due to a read-only root filesystem), subsequent file operations will fail.
To resolve this, ensure the container has a writable working directory using the `emptyDir` volume approach described above.